Written by Allen Wyatt (last updated September 3, 2022)
This tip applies to Word 2007, 2010, 2013, 2016, 2019, Word in Microsoft 365, and 2021
Blair reformatted a document that contains university lecture notes. The document contains large amounts of paragraph text, text boxes, and graphics. The lecturer wanted them returned as Word files. When the lecturer opens the document that Blair worked on, the formatting/layout changes. Blair wonders how he can retain the layout he created without saving the document as a PDF or some other format.
The most likely cause of this behavior is a setting on the Templates and Add-ins dialog box. Follow these steps:
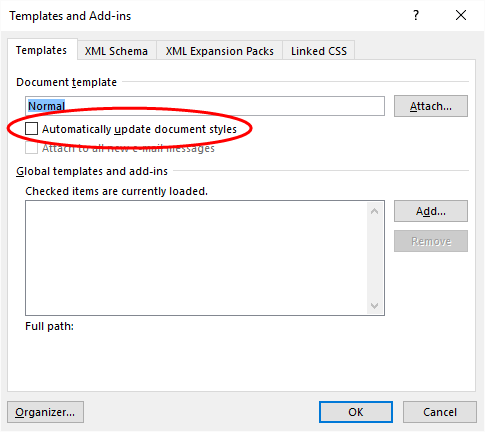
Figure 1. The Automatically Update Document Styles check box.
This setting controls whether the styles in the document are automatically updated based on the styles in the template or not. If your document is based on a template that has the same name as a template on the lecturer's computer, AND if this check box is selected, then when the lecturer opens the document, what he/she sees is formatted according to the definition of the styles in the template on his/her system. If the check box is cleared, then the styles in your document will not be updated from the styles in the template on the lecturer's system.
I can almost anticipate the next statement: "I don't use styles or templates in my document, however." Actually, you do. All Word documents use styles and templates, whether you know it or not. Every document (EVERY document) has a template attached, and every document relies on the built-in styles in Word. If you don't attach a different template to your document, then Word uses what is called the "Normal template." In the screen shot I included above, you can see that document uses the Normal template. The lecturer also has a Normal template on his/her system, and if you don't clear the check box already discussed, then when he/she opens your document, the styles in the Normal template on his/her system will overwrite the styles of the same name in your document.
There is much, much more that could be discussed about the relationship between your document, styles, and templates. They are very, very powerful, but if you don't understand the relationship, then it may seem like Word has a mind of its own when it comes to showing your document content on different systems. If you would like a quick overview of the relationships, then you'll enjoy this page on Shauna Kelly's site:
https://shaunakelly.com/word/sharing/willmyformatchange.html
If you have the Automatically Update Document Styles setting cleared and the document still doesn't look right when opened on the lecturer's system, then it is possible that there are other factors at play. The first thing to check is that the lecturer's system has the same fonts (from the same source) installed on his/her system. If you use fonts in your document that aren't available on the target system, then Word will substitute fonts that will result in the document laying out differently on that system.
It may sound strange, but you'll also want to make sure that the lecturer's system uses the same printer driver that is on your system. Word relies on the printer driver to determine how fonts should be rendered, and even if you use the same fonts, it is possible that different printer drivers will render those fonts in subtly different ways. The bottom line is that you could end up with differing amounts of text on each line on the different systems, which can affect pagination and layout.
WordTips is your source for cost-effective Microsoft Word training. (Microsoft Word is the most popular word processing software in the world.) This tip (12969) applies to Microsoft Word 2007, 2010, 2013, 2016, 2019, Word in Microsoft 365, and 2021.
The First and Last Word on Word! Bestselling For Dummies author Dan Gookin puts his usual fun and friendly candor back to work to show you how to navigate Word 2013. Spend more time working and less time trying to figure it all out! Check out Word 2013 For Dummies today!
Need to draw attention to some text? Consider using the Highlight tool, which functions just like the highlighter pens ...
Discover MoreWant to make your text look good on the finished page? This tip discusses a common speed bump in this quest--making the ...
Discover MoreOne of the tools that Word makes available on the Home tab of the ribbon is the Text Highlight tool. This functions ...
Discover MoreFREE SERVICE: Get tips like this every week in WordTips, a free productivity newsletter. Enter your address and click "Subscribe."
There are currently no comments for this tip. (Be the first to leave your comment—just use the simple form above!)
Got a version of Word that uses the ribbon interface (Word 2007 or later)? This site is for you! If you use an earlier version of Word, visit our WordTips site focusing on the menu interface.
Visit the WordTips channel on YouTube

FREE SERVICE: Get tips like this every week in WordTips, a free productivity newsletter. Enter your address and click "Subscribe."
Copyright © 2024 Sharon Parq Associates, Inc.
Comments